Wednesday, February 19, 2014

PEPPERCORN STEAK

I love good food, I always have. I am not a big meat eater however. Not because I don't like it, but mostly because it is never cooked, the way I ask for. For me, there is no point in ordering a steak out, if they cannot cook it the way you want it. I like my steak, medium rare. I expect to see "deep pink" in the center. I do not like, dried out, or overcooked meat, even a little. Pork Chops are another food I would never order out either. 
There is no mystery in cooking the perfect steak. I like mine without adornment as well. So rarely do I serve it with a sauce. But, there are always exceptions.
Steak Au Poivre (which is basically a heavily peppered rub, like we are using today, only with a cognac and cream based sauce) is traditionally served with a sauce, and, I will post a recipe for a complimentary sauce, another day.
For me though, it is all about the steak and pepper, so rarely do I make a sauce at home, unless I am serving dinner guests.


This is a perfect Valentine's Day Meal!
 

Ingredients:
1 6-8 oz. steak of choice, per person. Usually filets. (I used rib eye steaks this night)
A course Sea salt or Kosher salt.
Freshly ground peppercorns.


Directions:
Remove the steaks from the refrigerator and allow to come to room temperature.
Preheat oven to 450 degrees. 

Sprinkle both sides of each steak with salt.
Using coarsely ground pepper, cover both sides of each steak generously. 
Pat into meat well, and pepper again, one more time.
Place on 3rd tier (top rack)
For medium rare, cook for 4-41/2 minutes on each side. Cut center to check for readiness.
Let stand for several minutes, before serving.
TIP: Remember, the steak has just been broiled, so it is hot, and still cooking. (Keep that in mind when removing from the oven for the desired outcome. Add 2 more minutes to each side if medium to well done is how you enjoy it.)


Now Enjoy!

Saturday, February 8, 2014

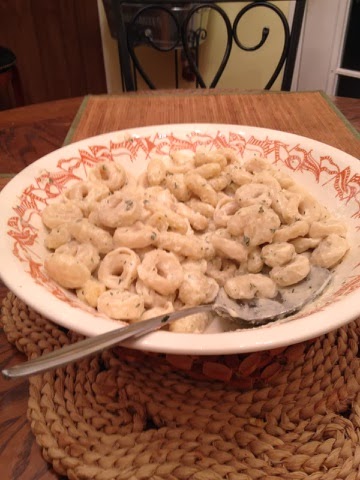
PASTA ALFREDO, a la Victoria & Nina

I've was so surprised the other night when my 18 year old daughter walked into the room with a dish of something that smelled so good, I couldn't help but feel hungry.
I've been feeling a bit under the weather since just after the Holiday's and cooking sadly has become more of a chore than an enjoyment right now. Let's face it, it's hard to cook when your stomach isn't feeling just right. :(
The biggest shock was, that I didn't know my daughter could cook! Yes, she is around me in the kitchen a lot, but I never got the feeling that cooking was her thing. Let alone, paying any attention. Boy, was I wrong!
I had nothing in particular planned for dinner, and it was getting to be that time. As I fell in and out of sleep on the couch, my daughter and her girlfriend decided to make the evening meal themselves.
This blog is all about how we, in our family both eat and live, everyday, and on special occasions too. You will NOT find collected recipes here, unless they are so outrageous they should never have been kept a secret in the first place. :)
Jayne's Crazy Kitchen is all about "working families," who want to eat well, but... cook fast. I say this only because, by default this night, I realized what I was doing, was actually working... right here, in my own house!

As a world traveler in my younger years, I've eaten Alfredo sauces just about everywhere. Some were superior, but I will concede that most, although good, were less than expected. Many bland, too heavy, separated, over/under spiced etc. Believe it or not, the best Alfredo sauce I've ever had, was in Zermatt, Switzerland, and the worst, was in Brooklyn, New York.
To me... A good Alfredo Sauce should be, just that, a sauce, not lumpy, a gravy, or full of "stuff". Because of the heavy ingredients, the finished sauce should actually be light, and not overpowering.
The girls... GOT IT PERFECT!!! and they knew it. They are the ones who took the photo's too. LOL
Thank you!!! Victoria G. and Nina C.

Prep Time: 10 min.      Cook time 15 min +/-      Servings: 6

Ingredients:
1 lb. of your favorite pasta. (The most commonly used is fettuccine) My daughter chose tortellini this night.
1 cup heavy cream.
3 tbsp. butter.
1/2 tea. salt.
pepper to taste.
2 cloves garlic, minced (Or several "shakes" to your taste, of dried garlic powder can be substituted.)
1 tbsp. parsley.
1/2 cup +/_  Parmesan cheese.

Directions:
In large pot, cook pasta according to directions on the box.
While pasta is cooking, in a medium sized pot, add butter on a low/medium heat, being careful not to let the butter burn.
Once butter is nearly melted, add cream, garlic, parsley, salt and pepper to taste, then cheese.
Allow to soft simmer for several minutes. (3-5)
Mixing well, and stirring often until the sauce has cooked down a bit, thickened and yet still remains creamy. TIP: TASTE AS YOU GO! (Add more cheese slowly, if a thicker consistency is wanted.)
Mix well again.
Pour over pasta, and Serve immediately


(Above, the chefs of the night. Left: Nina, Right: my daughter, Victoria.
They cooked this, instead of having that! You know what I'm talking about! LOL)
  Now Enjoy!

Saturday, February 1, 2014

A NOTE, AND SOME INTERESTING FOOD INFORMATION TOO!


I want to apologize for the difficulty Jayne's Crazy Kitchen Blog seems to be having of late, with  graphics not loading and lack of thumbnails pictures. It makes choosing a recipe to try, very hard to say the least, I know.
We still have a few small technical problems to work out, But, we believe we have successfully fixed the "problem" again. So... this is a test page ONLY.
I am adding 3 graphics to this page, of useful information by the way, and... a little "funny",  just to see if they will load to the page and, the proper thumbnails show up when I try to post them.
I want to thank you all again, for your great support, and help in getting Jayne's Crazy Kitchen, up and off the ground at such a soaring speed!
I continue to ask you to "SHARE" all posts. Re posting, and word of mouth, is the single largest draw to a  new website or blog like this one!
With each share you make, Jayne's Crazy Kitchen can at times add numerous new followers and new members, all... thanks to you! AND you know HOW MUCH WE LOVE, new "crazies"!
Talk us up! Make suggestions! Tell us what YOU want to find here and... we will do our best to accommodate every request.
At the bottom of each post is a comment box. I can't ask you all enough... to use it. Without your feedback, we cannot give everyone the types of recipes or food information you would like to try and see.


I can't help but laugh at this one. I have friends who would ask this question. LOL


Charts above, courtesy of: http://www.facebook.com/melanie.poynter.4 
These are recommendations only. 
As always, if on a special diet prescribed by your doctor, stick with it please!

Tuesday, January 28, 2014

CHICKEN CUTLETS

Just about every household eats chicken cutlets. They can be served in a variety of ways, but this night in our house, it was "American" in every way. LOL. Again, with these, I rarely have leftovers, and... if I do, we love making sandwiches with them the next day.
I do fry these, but, if necessary or preferred, they can be baked. (but I don't like them that way myself personally.)
This is a "staple" food. Learning how to cook these however, will give you the basics on how to pretty much fry or sauté just about anything.

Prep Time: 20 min.      Cook Time: about 30 - 35 min.      Servings: 1-2 cutlets/person.

Ingredients:
1- 11/2 lbs. Fresh Chicken Cutlets. (I use thin cut)
3/4 cups bread crumbs. (I use Italian Seasoned).
1 egg, beaten well.
2 tbsp. milk.
11/2 tsp. Prudohmme Chicken Magic Seasoning. *feel free to add more if you like a kick to your cutlets*
1/4 cup Parmesan cheese. (again, add more or less to your own taste preferences.)
Salt and pepper to taste.
3 tbsp.+ Olive Oil.
1 plate with double folded paper towel or brown bag on top, to drain, any excess grease after cooking.

Directions:
  • On your first plate, place your chicken cutlets that are ready to be breaded
  • In a 2nd small mixing bowl, stir together the eggs and the milk. 
  • Salt and Pepper the egg mixture to taste.
  • On a third plate, mix with your hands well, bread crumbs, spices, cheese, salt and pepper.
  • Take a 4th empty plate and add it to the line. (This is to place your finished breaded cutlets on.) 
 Now you should be set up like an assembly line, and it should be smooth sailing.
  • Take your first cutlet and dip it well into the egg mixture.
  • Now take the cutlet, and dredge it well in the breadcrumb mixture on BOTH SIDES. Make sure every part is coated.
  • Place it on your plate and repeat process for each cutlet, until they are all well bread crumb coated.

  • In a large skillet, on a medium heat, add olive oil and allow to warm for a minute or so.
  • Add cutlets, allow to fry for about 2-3 minutes, on each side, until a nice golden brown. Watch them closely though, because you don't want them to burn or become, too crisp or dry from overcooking.  (I use thinly cut cutlets so I don't cook them as long as I would if they were thicker.) TIP: Cutlets should have only clear drippings when cut. Then you always know they are done, but the meat, should always be moist.)

  • Place cooked cutlets on a plate that has been covered with a double folded paper towel, to be able to absorb any excess oil that might be left.
  • Place on tray and serve.
Add brown gravy, or Bearnaise sauce to the table, if you want to offer your family something a little extra!
Now Enjoy!


Monday, January 27, 2014

WHOLE BOILED LOBSTER

Many of you already know that Lobster, is by far my MOST favorite food in the world. Not only did I have a father who started out as a commercial fisherman, but, my early years were spent, growing up in New England, where fish, of any kind, was just... a way of life.
There is not a single way served, that I don't like lobster. But... if I want the best way, I just boil it.
Shell food is a funny thing. Most people either love it, or hate it. (Although I don't understand that at all).
It's hard to believe that there was a time in history when lobster was considered a "dirty meat" in North America, and usually thrown back, if caught in nets. Worthless in most people's eyes.
Now, it is an expensive, and at times, an elaborate luxury, that comes with "wet wipes", and of course a bib. Unfortunately, they haven't come up with a tool that stops a piece of shell, from accidentally flying across the room however!
I think I love lobster too, because, I LOVE, to make a mess when I am eating foods I adore. Lobster is one of those foods. Everyone expects you to be messy when your done anyway, so for me, it is a spiritual moment of absolute culinary delight!


Ingredients:

  • Live lobsters, 1 per person. (A 11/2 lb. lobster, is perfect for me.)
  • A LARGE pot of well salted, boiling water.
  • 2 tbsp. Old Bay (or to taste)
  • Butter.(melted)
  • lemon wedges (optional)

  • Directions:

    • Fill Large pot, about half way, add Old Bay, and salt WELL.
    • Bring water to a rolling boil. (You want enough water in the pot to be able to cover the lobster completely.)
    • Once water is boiling, add the lobster to the pot, head first. (BTW: Do NOT, remove, bands from claws, until the Lobster is cooked )


    • Allow to boil for appropriate time. (See chart below) For my 11/2 lb. lobster, I cooked it for 13 min.
    • Once cooked, and a nice bright red in color, remove from pot with tongs, and let sit for 5 min.
    • Melt butter, to be added for dipping at the table.
    • Cut off claw restraints.
    • Place on plate, and Serve with lemon wedges!!!

    My husband enjoys King Crab Legs, better than lobster, but, it is still, cooked the same way, just for a shorter time. His 3 Large crab legs, were cooked for about 3- 4 min., also at a rolling boil, using the same spices.
    This is what was left, in less than half an hour later!


    Now Enjoy!
    TIP: For timing, use the weight of individual lobsters, not total weight of all lobsters being cooked.

    If the lobster weighs: Boil:
    1 pound 8 minutes
    1 1/4 pounds 9-10 minutes
    1 1/2 pounds 11-12 minutes
    1 3/4 pounds 12-13 minutes
    2 pounds 15 minutes
    2 1/2 pounds 20 minutes
    3 pounds 25 minutes
    5 pounds 35-40 minutes

    Saturday, January 25, 2014

    PINEAPPLE UPSIDE DOWN CAKE

    My husband just recently celebrated his birthday. I thought I would surprise him with his favorite cake. So... Pineapple Upside Down Cake it was! The cake was so moist, and the sweetness, was just perfect for the amounts of sugar and pineapple used.
    This is a great cake to have on hand. Again, very easy to make, and doesn't take much time at all.
    We are a small family, so I don't usually cook big quantities. But for this cake, it's always a double batch, sheet cake. Which doesn't last more than a night or two in our house.
    Pineapple Upside Cake can be made with several types of pineapple. They don't have to be rings. Cut up pineapple works well too. The point is, the type of Pineapple you chose to use, is completely up to your taste preferences. For this cake, I used rings, and... I will confess, I didn't have quite enough of them, so I strategically spaced them out!
    Just so you know, the dark brown on the top of the cake, is NOT burned. That is a crystallized brown sugar and butter mix, and is what makes this particular cake, so delicious!
    I do make my cakes from scratch... 98% of the time, but... as hard as this is, for me to say, you can easily substitute a yellow boxed cake instead if you are pressed for time or ingredients.


           Prep Time: 15 min.       Cook Time: 30-35 min.      Makes: 1-9" Cake (round preferred)
    Above picture is a sheet cake because I made a double batch.
         
    Ingredients:
    Cake Batter
    2 cups all-purpose flour, spooned and leveled, sifted after measuring
    1 + 1/4 cup sugar
    1 tablespoon baking powder
    1 teaspoon salt
    1/2 cup butter, softened
    1 cup milk
    1 teaspoon vanilla extract
    2 eggs

    Read more at http://www.cinnamonspiceandeverythingnice.com/best-one-bowl-yellow-cake-recipe/#O6VZw7yJpo7HEURI.99
    11/2+/- cups all purpose flour, sifted. (Honestly, I am really bad at measuring ingredients. I usually eye ball almost everything I make.)
    11/4 cups packed brown sugar
    1 tea. salt
    1 tbsp. baking powder
    1 cup milk
    1/2 cup butter/softened (for cake)
    1 tea. vanilla extract
    2 large eggs
    ~~~~~~~~~~~~~~~~~~~~~~~~~~~~~~~~~~~~~~~~~~~~~~~~~~~~~
    1 cup+/- dark brown sugar.
    1/4-1/2 cup butter (for pan), cut into multiple small pieces.
    1 (20 ounce) can sliced pineapple, drained
    1 (8 ounce) jar maraschino cherries (optional)

    Directions:

    • Preheat oven to 350.
    (Making the cake batter):
    • In a mixing bowl, mix together the all the ingredients for cake batter above. Beat with electric mixer, until blended well and smooth.
    • Once cake batter is prepared, set aside.
    (Making the remainder of the cake):
    • Grease the bottom and sides of the pan lightly.
    • Cut up butter in small pieces and place all over the bottom of the pan you are using.
    • Sprinkle brown sugar generously, and evenly over the butter.   
    • Place pan in the oven and heat slowly until butter and sugar melt to a liquid then remove from heat.


    • Evenly place the pineapple pieces around the bottom of pan, on top and lightly pushed into the heated sugar and butter.
    • Place the cherries, down into the pineapple pieces.
    • Pour cake batter on top of the pineapple/cherry/mixture.
    • Place in oven and bake .
    • Cake is done when a toothpick, placed deep into the center of the cake, comes out clean.
    • Place a plate over the cake and turn upside down and carefully remove pan.
    • Let sit for 10 min. to set, then serve.
    TIP: You don't want to wait too long however, to remove the cake, because the sugar will begin to harden, and the cake will ultimately become difficult to remove from pan.


    Now Enjoy!
    

    Thursday, January 23, 2014

    HOMADE WHIPPED CREAM

    When I think about making anything that requires whipped cream, and really... what doesn't???  ;)
    I can't help but remember as a child, standing around my mother as she whipped the cream and sugar together with the electric mixer. It seemed like it took forever, but... then came the best part. My sister and I got to lick the mixer beaters. Oh God, that was so good!
    I think that's why I cringe when I look at Cool Whip or really any "whipped cream in a can".
    Making it fresh, doesn't take much more time to put together, than it does to retrieve it from the fridge, uncap, shake and squirt... what you hope will even taste remotely like the real thing.
    As I've said many times before, there of course is a time and place for everything, so substituting is allowed when time is of the essence. :D
    Remember though, if you go to all the trouble to bake a pie or a cake, then take the few extra minutes to make fresh whipped cream. You will NOT regret it!


    This is the Key Lime Pie I made last night, after I frosted it with home made whipped cream!!!
    Total Time: | Makes: About 2 cups
    Ingredients:
    • 1 cup heavy cream
    • 2 tbsp. confectioners' sugar. (11/2 tbsp. regular granulated sugar can be substituted without any problem too.) TASTE HERE, and adjust the sweetness to your own taste. The amount of sugar I use reflects the sweetness I like.
    • 1 teaspoon vanilla extract
    Directions:
    In a medium sized mixing bowl, add cream and beat with electric mixer on high until the cream just begins to peak slightly.


    Slowly begin to add the sugar, as you beat the mixture at a medium speed now.
    Again, slowly add the vanilla, and continue to mix, until the whipped cream begins to form medium peaks. (About 8 + minutes.)

    Just finished frosting the cake and then with a spoon, as seen above, made a little bit of a decorative design, with the back of a spoon.

    TIP: Before you start whipping, you can add flavorings (other than vanilla) to your whipped cream, such as lemon, orange or almond extract, a splash of liquor, like bourbon or rum, cocoa powder or even melted chocolate, the sky is the limit!
    TIP: Be careful not to over beat the whipped cream though. A few moments too much, and it can turn into butter. So keep an eye on the texture as you go. TASTE AS YOU GO!

    Now Enjoy!

    Wednesday, January 22, 2014

    KEY LIME PIE

    The first time I went to Florida, we went out to dinner that night. It was memorable. Not only did I eat foods I had never tried before. But because of the Key Lime Pie, which instantly became my absolute favorite pie of all time. I was immediately hooked. And, the best part about this pie, is that no two are ever even remotely alike, yet they are all absurdly delicious!
    I have eaten Key Lime Pie, that's filling was nearly white, to pies whose filling was almost a neon green, and everything in-between.
    True Key Lime Pie, is basically a light yellow color. Key limes are small and very aromatic and do not give you the expected "green" juice most people seem to expect.
    Traditionally (if there even is a tradition), most Key Lime Pie are made with a graham cracker crust. Of course, a regular pie crust works well too, but, the graham cracker really does, bring out the flavor in this one.
    A slice of  Key Lime Pie, can be served in a variety of ways too. Each slice I had, even looked different. Some were frosted with homemade whipped cream (which is how I make mine). Many were served "naked" with just a dollop of whipped cream, some had a meringue topping. So... pretty much anything goes when it comes to making this incredible delight. I'm sure they are out there, but I don't know anyone who doesn't like, Key Lime Pie.
    Again, this is an easy pie to make. The crust takes 5 minutes, there are only a few ingredients, and the little bit of time invested is well worth the effort. You really can eat your favorite foods, without having to slave in a hot kitchen all day!
    I honestly think many of us don't try cooking foods we would like to sometimes, because, we are a bit intimidated by ingredients we've never used or don't exactly know how to do something they've never tried before. But... remember, this is not brain surgery, and Jayne's Crazy Kitchen, does everything possible, to explain and illustrate every recipe here. So that each step is a clear in the "how to" as possible. As always, leave me a comment below the post if you would like to add a suggestion or opinion. Your input is important to us!
    Prep Time: 15-30 min.     Cook time: 30-35 min.      Servings: 6-8

    INGREDIENTS FOR PIE FILLING:
    3 Large Egg Whites
    3/4 cup Key Lime Juice (or about 30+ freshly squeezed key limes. They are small, so you need a lot)
    1 can (14 oz.) Sweetened Condensed Milk
    *•.¸¸¸.•*¨¨*•.¸¸¸.•*¨¨*•.¸¸¸.•*¨¨*•.¸¸¸.•*¨¨*•.¸¸¸.•*¨¨*•.¸¸¸.•*¨¨*•.¸¸¸.•*¨¨*•*•.¸¸¸.•*¨¨*•.¸¸¸.•*¨¨*•.¸¸¸.•*

    HOW TO MAKE A GRAHAM CRACKER CRUST FROM SCRATCH:
    Makes 1 graham cracker pie crust.

    INGREDIENTS FOR CRUST:
    1 9" pie pan
    1/3 cup melted butter.
    1 1/2 cups graham cracker crumbs (or 10 to 12 whole graham crackers ground with food processor, or mortar and pestle.)
    1/4 cup sugar.
    1/2 teaspoon cinnamon, (optional).
    (I don't add this to key lime pie. However I do include it when I am making other particular types of pies.)

    TO MAKE THE CRUST: (This step takes all of 5 minutes to complete)
    In a medium-sized bowl or a food processor, combine graham crackers, sugar, and melted butter. Blend until the texture of coarse meal.
    Press into a 9- or 10-inch pie pan. Try to make the crust about 1/8 inch evenly all around.
    If the crumb mixture won't stick where you press them, just add another tablespoon of water to the mix.
    Pat the crumbs down and make sure there are no gaps or holes.
    TIP: If you chill the crust for an hour before you bake it, this will help prevent crumbling when you want to serve it.
    Bake approximately 8 minutes. The edges may be just slightly browned, but you do not want them to burn.
    Remove from oven and let crust cool, on a wire rack, before filling.
    *•.¸¸¸.•*¨¨*•.¸¸¸.•*¨¨*•.¸¸¸.•*¨¨*•.¸¸¸.•*¨¨*•.¸¸¸.•*¨¨*•.¸¸¸.•*¨¨*•.¸¸¸.•*¨¨*•*•.¸¸¸.•*¨¨*•.¸¸¸.•*¨¨*•.¸¸¸.•*

    DIRECTIONS TO BAKING THE COMPLETE PIE:
    Pre heat oven to 350.
    In a medium sized mixing bowl, add eggs whites and mix with electric mixer on high, until the eggs are fluffy and light.
    Add milk, and mix on medium speed, until liquid begins to thicken. (about 2+ min)
    Mixing on slow speed now, gradually add the lime juice, until just combined.
    Add the mixture to your waiting pie crust.
    Bake for approximately 15 min.
    Remove from oven, and allow to cool on rack completely.
    Refrigerate until ready to serve.
    I do frost my key lime pie, with homemade whip cream, which is one of tomorrow's post!


    Now Enjoy!