Tuesday, November 5, 2013

PARMESAN ENCRUSTED ROASTED CHICKEN

Chicken meals are a staple in our house. No one ever says no to chicken!!! Especially if I change it up from time to time. I like this dish a lot. I like dark meat, my daughter, white meat, and my husband will eat whatever is given to him *LOL*, So... I usually provide both. This night I made the recipe with chicken thighs.
This is easy to make. And it's always a hit. It is moist, juicy and deliciously subtle. It lends itself to just about anything else you wish to add, to finish off the meal. This night, I served it with Roasted Garlic Vegetables, and Parsley Potatoes. I was going to make a salad, but... knowing everyone would be incredibly full after this dinner, I didn't bother, and ... it wasn't missed.
I LOVE to cook. I LOVE to use spice. I LOVE balancing flavor blends. AND... I HATE when something over powers a dish.
This is when cooking becomes art. And "the art of cooking begins, with tasting as you go"...Jayne's Crazy Kitchen.
I cannot stress that point enough. How else are you going to know what you like and don't, if you don't taste it?
This dish, is light, even though it is covered in Parmesan Cheese. The vegetables were perfect, even though they were garlic roasted. Finding the point where everything blends, is the making of a perfect meal. A single ingredient, should never deter you from cooking something new. Adjust it, YOU are the cook!!!

Prep. Time: 20 min.   Cook Time: about 22 min.   Servings: 4
 
Ingredients:
  • 1 cup all-purpose flour
  • 2 large eggs
  • 2 cups panko (Japanese bread crumbs)
  • cup grated Parmesan cheese, divided
  • 3/4 tablespoon mustard powder
  • Sea salt and freshly cracked black pepper
  • 4  medium chicken thighs (about 1½ lb. total)     
  • olive oil  (approximately 6 - 8 tbsp.)
Directions:
  • Pre-heat oven to 350 degrees.
  • Place flour in a bowl.
  • Beat eggs in a second bowl.
  • Combine bread crumbs, 1/2 of Parmesan cheese, and mustard powder in a third bowl.
  • Season mixture with salt and pepper. 
  • Salt and pepper chicken.
  • Now, dredge chicken in flour
  • Dip the floured chicken into the beaten eggs, coating well.
  • Now dredge the chicken in the breadcrumbs, again coating well on both sides.
  • Heat olive oil in a large skillet on a medium heat.
  • Brown chicken, starting skin side down, until breading is a light golden brown and the chicken is almost cooked through.(about 2 - 3 min.) Turn chicken over, and brown again until a soft golden color is achieved.
  • Transfer chicken to an 8x8 baking pan.
  • Season chicken lightly with salt and pepper to taste. 
  • Sprinkle and cover, each chicken part, with the remainder of the Parmesan Cheese
  • Place in oven, and bake until cheese has melted and chicken juices run clear. (about 15 min.).
  • Serve immediately
 
 NOW ENJOY!


IN DEPTH NURTIENT ANALYSIS: POTATOES

IN DEPTH NURTIENT ANALYSIS: POTATOES

CHART BELOW, COURTESY OF "THE WORLD'S HEALTHIEST FOODS".
AN EXCELLENT RESOURCE FOR JUST ABOUT ANY FOOD YOU ARE CURIOUS ABOUT.
http://www.whfoods.com/genpage.php?tname=nutrientprofile&dbid=101

Potatoes
(Note: "--" indicates data is unavailable)
amount1.00 each baked
total weight173.00 g
BASIC MACRONUTRIENTS AND CALORIES
nutrientamount%DV
Protein4.32 g8.64
Carbohydrates36.59 g12.20
Fat - total0.22 g0.34
Dietary Fiber3.81 g15.24
Calories160.898.94
MACRONUTRIENT AND CALORIE DETAIL
nutrientamount%DV
Carbohydrate:
Total Sugars2.04 g
Monosaccharides1.35 g
Disaccharides0.69 g
Soluble Fiber0.95 g
Insoluble Fiber2.86 g
Other Carbohydrates30.74 g
Fat:
Monounsaturated Fat0.01 g0.04
Polyunsaturated Fat0.10 g0.42
Saturated Fat0.06 g0.30
Trans Fat0.00 g
Calories from Fat2.02
Calories from Saturated Fat0.54
Cholesterol0.00 mg0.00
Water129.56 g
MICRONUTRIENTS
nutrientamount%DV
Vitamins
Water-Soluble Vitamins
B-Complex Vitamins
Vitamin B10.11 mg7.33
Vitamin B20.08 mg4.71
Vitamin B3 (Niacin Equivalents)3.56 mg
Vitamin B60.54 mg27.00
Vitamin B120.00 mcg0.00
Biotin-- mcg--
Choline25.60 mg6.02
Folate48.44 mcg12.11
Pantothenic Acid0.65 mg6.50
Vitamin C16.61 mg27.68
Fat-Soluble Vitamins
Vitamin A (Retinoids and Carotenoids)
Vitamin A International Units (IU)17.30 IU0.35
Vitamin A mcg Retinol Activity Equivalents (RAE)0.86 mcg (RAE)
Retinol mcg Retinol Equivalents (RE)0.00 mcg (RE)
Carotenoid RE1.73 RE0.02
Beta-Carotene10.38 mcg
Lutein and Zeaxanthin51.90 mcg
Lycopene0.00 mcg
Vitamin D
Vitamin D International Units (IU)0.00 IU0.00
Vitamin D mcg0.00 mcg
Vitamin E
Vitamin E mg Alpha-Tocopherol Equivalents (ATE)0.07 mg (ATE)0.35
Vitamin E IU-- IU
Vitamin E mg-- mg
Vitamin K3.46 mcg4.33
Minerals
nutrientamount%DV
Boron-- mcg
Calcium25.95 mg2.60
Chloride-- mg
Chromium-- mcg--
Copper0.20 mg10.00
Fluoride-- mg--
Iodine-- mcg--
Iron1.87 mg10.39
Magnesium48.44 mg12.11
Manganese0.38 mg19.00
Molybdenum-- mcg--
Phosphorus121.10 mg12.11
Potassium925.55 mg26.44
Selenium0.69 mcg0.99
Sodium17.30 mg0.72
Zinc0.62 mg4.13
INDIVIDUAL FATTY ACIDS
nutrientamount%DV
Omega-3 Fatty Acids0.02 g0.83
Omega-6 Fatty Acids0.07 g
Monounsaturated Fats
14:1 Myristoleic-- g
15:1 Pentadecenoic-- g
16:1 Palmitol0.00 g
17:1 Heptadecenoic-- g
18:1 Oleic0.00 g
20:1 Eicosenoic-- g
22:1 Erucic-- g
24:1 Nervonic-- g
Polyunsaturated Fatty Acids
18:2 Linoleic0.07 g
18:3 Linolenic0.02 g
18:4 Stearidonic-- g
20:3 Eicosatrienoic-- g
20:4 Arachidonic-- g
20:5 Eicosapentaenoic (EPA)-- g
22:5 Docosapentaenoic(DPA)-- g
22:6 Docosahexaenoic (DHA)-- g
Saturated Fatty Acids
4:0 Butyric-- g
6:0 Caproic-- g
8:0 Caprylic-- g
10:0 Capric0.00 g
12:0 Lauric0.01 g
14:0 Myristic0.00 g
15:0 Pentadecanoic-- g
16:0 Palmitic0.04 g
17:0 Margaric-- g
18:0 Stearic0.01 g
20:0 Arachidic-- g
22:0 Behenate-- g
24:0 Lignoceric-- g
INDIVIDUAL AMINO ACIDS
nutrientamount%DV
Alanine0.13 g
Arginine0.20 g
Aspartate1.06 g
Cystine0.05 g12.20
Glutamate0.72 g
Glycine0.13 g
Histidine0.09 g6.98
Isoleucine0.17 g14.78
Leucine0.26 g10.28
Lysine0.26 g11.06
Methionine0.07 g9.46
Phenylalanine0.19 g15.97
Proline0.16 g
Serine0.19 g
Threonine0.16 g12.90
Tryptophan0.07 g21.88
Tyrosine0.16 g16.49
Valine0.24 g16.33
OTHER COMPONENTS
nutrientamount%DV
Ash-- g
Organic Acids (Total)0.94 mg
Acetic Acid0.00 mg
Citric Acid0.80 mg
Lactic Acid0.00 mg
Malic Acid0.14 mg
Taurine-- mg
Sugar Alcohols (Total)-- g
Glycerol-- g
Inositol-- g
Mannitol-- g
Sorbitol-- g
Xylitol-- g
Artificial Sweeteners (Total)-- mg
Aspartame-- mg
Saccharin-- mg
Alcohol0.00 g
Caffeine0.00 mg

Note:

The nutrient profiles provided in this website are derived from Food Processor for Windows, Version 7.60, by ESHA Research in Salem, Oregon, USA. Of the 21,629 food records contained in the ESHA foods database, most of them - including those of the World's Healthiest Foods - lacked information for specific nutrients. The designation "--" was chosen to represent those nutrients for which there was no measurement included in the ESHA foods database.

THE TRUTH ABOUT POTATOES

 
Potatoes have an undeserved, bad rap! They are delicious, nutritious, and seriously misunderstood. Potatoes are associated with carbohydrates, that most of us think will put on the pounds. The truth is, potatoes are a root vegetable, low in carbohydrates and considered a good starch, that shouldn't be omitted from a healthy diet.
It is the world's fourth-largest staple crop, following rice, wheat, and maize. Potatoes provide fiber, protection against colon cancer, improves glucose tolerance and insulin sensitivity, has been noted to lower cholesterol and triglycerides, and possibly even reduces fat storage, with blood-pressure lowering potential.
Potatoes are made up of 79% water. They are actually lower in carbohydrates than some green veggies. They are a good source of Potassium and fiber, and even have a fair amount of Vitamin C and B6. They provide us with Copper, and Manganese.  And.. as you can see, I am a big fan!


Potatoes originated in Peru and Bolivia, and have become a multi-cultural staple. They are storable, long term, and in the same family, whose other relatives include eggplants, tomatoes, peppers, and tomatillos.
"Unfortunately, most people eat potatoes in the form of greasy French fries or potato chips, and even baked potatoes are typically loaded down with fats such as butter, sour cream, melted cheese and bacon bits. Such treatment can make even baked potatoes a potential contributor to a heart attack. But take away the extra fat and deep frying, and a baked potato is an exceptionally healthful low calorie, high fiber food that offers significant protection against cardiovascular disease and cancer."
courtesy of http://www.whfoods.com
Potatoes are often packaged conveniently in 5 lb. plastic bags. However, it is usually better to buy them individually. Potatoes should be firm, and relatively smooth. Also, they should not be sprouting or have green discoloration. Buying them individually, allows you to inspect the potatoes for signs of mold. Plastic bags are not always perforated and can cause a build up of moisture that can affect the potatoes, giving them an unpleasant taste, It is important to note though, that... eating a potato that is bad, (i.e. moldy, sprouting, decayed, green, or soft) can cause health problems, such as circulatory problems, respiratory problems, diarrhea, headaches and even depression.
The more we know about the foods we eat, the better prepared we are to choose foods that are healthy and beneficial. And... the way we prepare these foods, are the main contributors of weight gain, or weight loss.
"Potatoes should not be stored in the refrigerator, as their starch content will turn to sugar giving them an undesirable taste. In addition, do not store potatoes near onions, as the gases that they each emit will cause the degradation of one another. Wherever you store them, they should be kept in a burlap or paper bag. Mature potatoes stored properly can keep up to two months. Check on the potatoes frequently, removing any that have sprouted or shriveled as spoiled ones can quickly affect the quality of the others. New potatoes are much more perishable and will only keep for one week. Cooked potatoes will keep fresh in the refrigerator for several days. Potatoes do not freeze well. " courtesy of http://www.whfoods.com

JAYNE'S BEEF STROGANOFF-CROCK POT RECIPE

I love Beef Stroganoff on a chilly, windy night... It warms the bones and tastes so good, especially if you are eating it while sitting in front of a roaring fire with a nice glass of Merlot wine. Another comfort food that never seems to loose it's appeal. Again, this is my way... But there are thousands of ways to make this dish. In our family, my daughter eats this before I add the cheese and sour cream. She is not a fan of either, but loves the beef and the stock, so I take enough out of the pot for her, before I finish the dish. So... not only delicious, but it is versatile enough for the finicky eater in your house. I'm not big on crock pot cooking, but every now and then even I find a recipe with ingredients that I can live with. Like I have said before I am not a fan of canned and frozen ingredients, but there are exceptions to every rule, and this is one of them. There are times that you need a good meal on a busy night, and just can't cook. This is a great way to do it!!!

  Prep. Time: 20 min.  Cook time: 8 - 9 hours  Servings: 8
Ingredients:                            
                      
2 lbs. pounds beef stew meat in bite sized cubes
flour
1 medium onion, chopped, diced or sliced ~ your choice. I chopped mine.
1 jar savory beef gravy
1 can cream of mushroom soup (condensed, do NOT add water)
1 can sliced mushrooms, drained
1/2 tsp. paprika
salt and pepper to taste
4 oz. cream cheese at room temp (or softened)
6 oz. sour cream
1 bag extra wide egg noodles 
                     
Directions:
  • Use a crock pot that is at least a 3 1/2- to 4 1/2-quart slow cooker.
  • Dredge the beef cubes in the flour.
  • In the pot, mix beef, onions, gravy, soup, mushrooms, paprika, salt and pepper.
  • Cover slow cooker tightly
  • Set on Low for about 8 - 10 hours, or until beef is the tenderness of your preference.
  • At this point, this is a good amount of Beef Stroganoff. If you would like to freeze half of it for another night. This is the time to take what you want out, (before... adding cheese and sour cream.) Place in containers, and allow to cool down to room temperature before freezing. The mixture freezes very well and keeps,  for at least 6 weeks. When ready to use again, defrost, reheat add, cream cheese and sour cream then.). ***Remember if you do remove half the mixture... then only use half of the cream cheese and sour cream to the remainder of the pot still cooking.***

  • Once your beef is cooked to the tenderness you want, add the cream cheese.
  • Stir entire mixture in the crock pot well, cover tightly again, and cook undisturbed for about 15 minutes or until the cream cheese has completely melted.
  • Stir in the sour cream, when the cream cheese has melted.
  • Stir well again, and allow to cook for 5 more minutes (if you desire a thicker stroganoff, add a heaping tsp. of corn starch mixed with 3 oz. water, stir well, cover and cook for 5 - 8 more minutes. If you want your Stroganoff thinner, add as many Tbsp.'s as needed of 1/2 + 1/2, beef broth, or water.)
  • At this point, cook your egg noodles according to package
  • When the egg noodles are ready, drain well.
  • Stir your Beef Stroganoff mixture well, one more time.
  • Now... Serve your Beef Stroganoff over a hearty plate of Egg Noodles!!!
Accompany your Beef Stroganoff with a nice fat crusty loaf of Italian or Sourdough Bread, and a light salad. Add a glass of your favorite red wine, and you have... a perfect meal!!! 
"With no muss, no fuss"!!!
 
 
 NOW ENJOY!!!

Monday, November 4, 2013

JAYNE'S BREAKFAST BUBBLE BAKE

This is such a great hit on busy mornings, especially after 8 teenage girls sleepover the night before!!!It is easy AND fun, to make. Pull and Run are the words of the morning, and you will soon see why.
Breakfast is... the most important meal of the day. It's what gets the creative ideas and thoughts flowing, with enough energy to maintain a grueling morning of swim practice, soccer practice, crew practice, horse camp and all the other destinations the kids were off to.


Prep time: 20 min. Cook time: 5 min.
Bake time: according to biscuit package + 2 min. Yield: 8 servings.


Ingredients:

2 - 8" baking/casserole pans
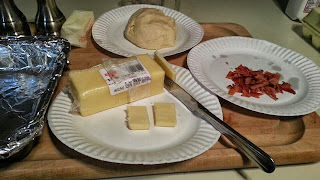
2 - packages grand buttermilk biscuits (or any variety of roll or biscuit you like. For this, I used flaky crescent roll tubes, because it was all I had in the fridge at the time. It's a difficult dough to work with because it gets very sticky, very fast, and you don't want to over handle it. So you have to keep it in the fridge as you cook. I prefer the nice big grand buttermilk biscuits for this recipe, they are round, an easier dough to work with, separate, and are simple to "stuff". But... point is; use what you have.)
8 oz. Cheddar Cheese ~  Cut up into small cubes. (I used mild cheddar, but any cheese that you like and melts well, will work)
5 full slices of bacon (cooked crisp, cooled and crumbled) *I cut the slices in half, put it on a paper toweled, paper plate, and microwave for about 2min. 40sec.
3 eggs scrambled (do not use butter or oil in the pan, I do use pam spray if needed for this recipe to scramble the eggs. Butter will make the mixture too difficult to work with, AND your biscuits will be greasy, and we certainly don't want that.  Just whisk eggs together, salt and pepper to taste and scramble then set aside)
Salt and Pepper to taste
Kitchen Scissors

Directions:
  • Cook the bacon. Drain, cool, then crumble. Set aside
  • Pre heat oven to 350 degrees, (or whatever temp. biscuit package recommends)
  • Scramble the eggs, and again, set aside
  • Slice the cheese, and cut into small cubes. Yep... set aside.
  • Open the first roll of biscuits
  • Separate the individual rounds
  • With a kitchen scissor, cut each round into various sized pieces. (i.e. One round biscuit, cut in half, One round biscuit, One round biscuit, 3 pieces... you get the idea, you want different sized balls of dough.)
  • gently (handle the dough, as little as possible) roll your pieces now into balls, and with a sharp knife, slice the middle of each, almost to the end of the ball, but not separating it.
  • Open the now sliced biscuit piece
  • Place a "small" cube of cheese (appropriate sized of course. Smaller cubes for smaller pieces.) If you happen to be using crescent roll dough, unroll, and then gently mold into a ball. Using it, you will just pull apart the dough from the main ball, in different sizes. Then proceed with next step as usual.
 
These pictures were taken using crescent roll dough that I gently molded into a big
dough ball, then I pulled off a piece of dough. I pressed the ingredients down, and just balled it up, covering as much of the filling as I could.
  • Now place a few crumbles of bacon
  • Now add a little bit of scrabbled egg
  • Lastly, top with a few more crumbles of bacon.
  • Press stuffing in dough, down softly and seal the seams of the now flattened balls. and shape. (Use a touch of warm water if needed, usually though, the dough is sticky enough to stay sealed. No biggie, if there are a few open spots. This is fun!!! Perfection is not required!!!)
  • Now place your stuffed biscuits, of different sizes, tight together in your baking pan.
  • (I line the pan with aluminum foil for an easier clean up, but is not necessary)
  • Bake in oven according to biscuit package + 2 minutes until golden brown, turning pan, once half way.
This is a picture of the second baking pan. I didn't get enough time to take a picture of the first. *LOL* Don't worry if it doesn't fill the pan completely. If they are placed in the pan tightly and touching, it won't make any difference at all!!!
  • Remove from oven, slide, using a spatula, onto a platter... and Serve!!!
Get them while you can, because there is sure to be none left, when you go back for seconds.
 
NOW ENJOY!!!

TOMATO, BASIL, MOZZARELLA SALAD


This is probably the biggest, single staple in our house. This little salad shows up frequently in photos of other recipes found here. The beauty of this salad is that it blends well with pretty much anything you are serving.
I especially love this salad with big hearty meals, like Beef Stew, Beef Stroganoff, Pork Roasts, Steaks, and so much more. It is light, refreshing and delicious. The best part? It takes only 5 minutes to put together. 
Italians, many times, eat their salads at the end of the meal, unlike "medicans" *LOL* (Americans) who eat most salads at the beginning of the meal. This salad cleanses the palette, leaving you refreshed or ready for the delicious tastes of whatever desert you might be serving afterwards.
It is also a way to ensure there is no leftover bread on the table, that would have to be frozen otherwise. The dressing is perfect for mopping up with crusty Italian bread, when all the tomato mixture is gone!!! This is also a recipe that you MUST taste as you go.
 
Prep Time: 5 minutes,  Cook Time: none, Yield: 4 servings
 
Ingredients:
3-4 vine ripened tomatoes, washed well and diced. *This is a dish where quality tomatoes are a must, there is no taste like tomatoes right off the vine. *TIP* Do not refrigerate tomatoes, unless they have already been sliced. If you do, they do not have a chance to ripen fully, and end up with literally no taste.
6 - 10 fresh basil leaves, chopped up into tiny bits (use dried if fresh is not available)
3- slices mozzarella cheese, diced small (I usually use  about 6 - 8 small, fresh mozzarella balls from my local Italian market, but Polly-O, or Maggio (whole milk) mozzarella, slices and dices well also. This can be found in most local supermarkets.
 
 
salt and pepper to taste.
Olive oil (I eye the amount, but just enough to coat everything well, and mix with the juices of the tomato)
Red wine vinegar (again, a matter of taste, I add a "splash" feel free to add more if you'd like)
Taste, add salt and pepper if necessary.
 
Directions:
  • In appropriate sized bowl, place your diced tomatoes.
  • Add your finely chopped basil.
  • Now add your small diced mozzarella cubes.
  • salt  liberally and pepper to taste. (I find that tomato salads require a bit more salt than you would normally use.)
  • Mix well with a spoon.
  • I make this so often so I don't measure, but now, in a circular motion, add the olive oil. (Around the bowl twice) You don't want to add too much, but not too little either. Refer to the picture below, to get an idea of how much to use. The oil and vinegar, mix with the juices of the tomato, leaving a delicious dressing.
  • Do the same thing again, with red wine vinegar. Use less here however. You want to taste the hint of vinegar, but you don't want it to over power the salad either. Taste again. If there is too much oil, then add a bit more vinegar. If too much vinegar, then use a little more oil. You get the idea!!!
  • Lastly taste again, and add more salt and pepper to suit your taste, if needed. 
 
NOW ENJOY!


Sunday, November 3, 2013

JAYNES HEARTY BEEF STEW

I am starting this blog out with many of my favorite recipes. The meals I cook often, that have the best mixture of healthy food ratios, and... that are crazy good!!! This delicious Beef Stew is a staple in my home. It is sure to be a crowd pleaser, when the kids friends come over and hang for dinner. The pot is full and there's always room for 1 or, 2 or, 3 more, as they say. No one in our house ever complains when they walk through the door, and get the first whiff of the wonderful aroma's of this delicious, one pot meal. If your house is as "crazy" as mine at times, then you will be happily, store these leftovers, if there are any, for quick night warm ups when the kids are on the go. (don't be put off regarding the number of servings, believe me, and left overs do well for about 7 days, just in the fridge. You can freeze this, but honestly, I never have too. 

I start out a little bit differently than with most stew recipes. I don't use cut up cubes of stew meat. Instead, I use a nice marbled chuck pot roast, that's not too lean. A little bit of fat, is quickly offset by all the "good carbs" of the root vegetables, helps keep the meat moist. Beef is also an excellent source of protein.  For all of us who are trying to loose weight. This is a great dish, as odd as it may seem.

The results are amazing. When cooked low and slow, this cut of meat, is as tender as any could be. And SO easy to cut up, after it's cooked. The meat cuts easily while still hot, and can be tossed right back into the pot again. 

This is when individual preferences come in. There is NOTHING wrong with using chuck stew meat. I just personally prefer the texture and tenderness of this cut of meat more (a pot roast) for stew. What I also love about this meal is that it doesn't have to be eaten the day you make it. Actually, once cooked, and left to sit overnight in the fridge, I think it may taste even better.  The flavors are more blended, and it heats up, in just a few minutes.
Can you tell I've made this a few hundred times?

  
This is a very easy meal to cook, But.... it is, all about the timing.
Which only means that you have... to set a timer
If I didn't have a really loud, annoying, alert, I couldn't function. I get side tracked a lot.
 
Prep Time: 20 minutes, Cook Time: 3 - 31/2 hours, Yield: 8 - 10 servings 
 
Ingredients:
 
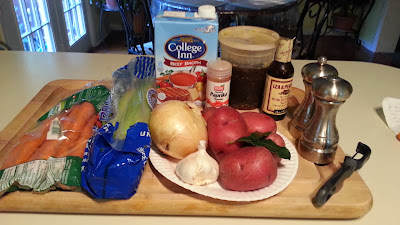
3 lbs. Nicely Marbled Chuck Pot Roast
2 tbsp. olive oil (or oil of your choice)
1 medium onion, sliced, then cut, but not diced.
5 medium red potatoes, scrubbed well (peeled or unpeeled) I used red, because it's what I had, but, use the type of potato you like.
4 - 5 carrots, peeled, cut into bite sized pieces
2 stalks celery, sliced
48 oz.+ Approximately (6+ cups) Beef Stock or Broth
1 tsp. Worcestershire sauce
1 tsp. paprika
2 bay leaves whole
2 cloves garlic, minced
1/2 tsp. salt
1/2 tsp. pepper
4 heaping tbs. of cornstarch
4 oz. of cold water
Loaf of Crusty Italian, or Sourdough bread
(If I were cooking this just for myself, I would have also added 8 large mushrooms sliced and, maybe a little cubed orange turnip. Peas work well too, sometimes I add snow peas, if I happen to have them in the fridge. Point here; there is nothing you can't add. (And remember, try to use "fresh", whenever you can.There is no comparison in the taste.)


Directions: 
  • Put the oil into your soup pan, turn on heat to medium/high. I use an electric stove, yuck... but, that for me is at between 6 and 7.
  • Now brown the meat. You want it seared but not cooked... about 5 min. on each side., When it is ready, it will come up easily so you can turn it. Don't get nervous and pry it out, you will leave half your meat, stuck to the pot. The meat is nice and brown, but not burned. If it is sticking to the pan, then it's not ready to be turned. When it is, it will come up easily.  Below is an example is how you want it to look.
  • Ok, this is the major part of the stew, already out of the way. Drain off any excess oil that might be left in the bottom of the pan. Now, cover the meat with the beef stock or broth (whichever you are using, making sure there is enough liquid, not only to cover the meat, but still have enough to take into consideration, how much liquid the carrots and the potatoes, are going to soak up. *if in doubt, add more, water is ok too if you have already used the full 48 oz.*
  • Add the minced garlic, bay leaves, celery, onion, paprika, and Worcestershire sauce. Salt and pepper to taste, only if needed. Stir, to mix.
  • Bring entire pot to a soft boil, then reduce heat, cover, and simmer for about 2 hours, 20 minutes. Set your timer now!!!
  • Prep your carrots and potatoes, put them in a bowl of cold water, and cover, with a paper plate. This is only done, so the potatoes and carrots don't turn that brownish color when they are peeled and left out to the air for a while.
  • Next step... Make a cup of tea, or coffee, find a comfortable place to put your feet up, and read a book, give yourself a new coat of nail polish, play with the dog. You won't have to check your pot now, until your timer goes off. Unless of course, you can't stand the beckoning aroma's that have started to permeate your house, and just have to go into the kitchen to taste.
  • When your timer goes off, yes... you do have to get up now. ;) Remove the cover on your pot, and with a fork, stab the meat and lift it slightly. If the meat is already starting to try to fall apart, that it great!!! Put it back down into the pot and, NOW, add the potatoes and carrots. Turn up the heat just a little bit, to a hard simmer starts again, and cover. Set the timer again for about 25 min. or until the tenderness of your vegetables are the way you like them. *This is the part of the recipe that is very versatile. You can adjust the time you cook your vegetable to the right consistency for you.*
  • Now, check your meat with the fork, again. Try to pick it up slowly... if the meat, is falling apart, and you can see some shredding of it, remove the meat with a slotted spoon *That will be the best tip you've had all day. If you try to take out the entire piece of meat with a fork. It's disastrous and place on a plate. Now, check your vegetables, If they are done to your satisfaction, remove pot from heat, BUT...don't turn the burner off, because you are going to put the pot right back on in a minute... for a few more minutes. I can't even begin to tell you how HOT that mixture is, so be VERY careful, not to give into temptation, and taste it. You will have 3rd degree burns!!! (I do it EVERY time, and want to cry... )
Cut up the meat now, pull it, and cut bite sized pieces, have a mixture of as much or as little of the meat consistency you like. My husband likes chucks of meat. I like smaller pieces, and I especially like the shredded meat. What this means is; that there will be delicious meat, in every spoonful. Since the meat should be so tender, cutting it up should take  just a few minutes. Put your now, cut up beef, back into the pot with your vegetables. Stir together, the cornstarch/water mixture and add to the pot. Stir the pot well and cover again. This will thicken the stew to the perfect consistency.(In my opinion) Bring the pot, back up to a simmer, for about 4 - 5 minutes. 


This is just about ready to serve, and what your stew should look like.
  • TIP: Still too thin for you? Add 2 more heaping tbsp. of cornstarch/2oz.cold water, to the pot and bring back to a simmer for a few more minutes. Too thick for you? Add a little bit of water. A stew should be like a hearty gravy... but everyone has their own favorite way.
  • Remove the pot from the heat, take out bay leaves, and ladle into deep soup bowls.
  • Slice a nice crusty loaf of Italian or Sourdough bread, and serve.
 
I served the stew, with a crusty loaf of Italian bread, and a simple tomato, mozzarella, basil salad. You will see that little tomato salad on my table many times throughout this blog. I find it compliments so many "hearty meals" with a light and delicious taste.

 NOW ENJOY!

FLAKY CRUSTED TACO PIE

This is a recipe that I have collected, and many of you, have seen it often, being passed around on Social Networks. The reason it is so popular, is that it is... DELICIOUS!!!
I made this the other night for a party, I should have made 3. In the time it took me to serve a slice and trimmings to my husband, the pie was GONE. The kids loved it, and so did I!!!


I made NO changes to the original recipe, when I made the pie pictured above.. It was perfect!!! However, next time I will increase the amount of ground beef, cheese, taco mix and decrease the amount of crescent roll tubes.
The pie, although perfect, should have been fatter. It could have easily held 11/2 - 2 lbs. of ground beef, 11/2 - 2 pkg. Taco Mix *I like Ortega* and double the cheese. Instead of using 2 tubes of crescent rolls, I think one would have been perfect. You should be able to see the meat between the wedges of flaky crust, and once the crust is laid out, there is more than enough left to fill in the center of the pie plate. Either way, the pie is great, and ALWAYS A HIT!!!
 
I am giving you the original recipe. My observations and changes are mentioned above. Then make your own decision. You can't go wrong either way!!!

Ingredients:

 2 crescent roll tubes
 1 LB ground beef 
 1 packet of taco seasoning
 1 1/2 cups grated cheddar cheese
 Shredded lettuce
 1 or 2 diced tomatoes depending on size
 1/2 small can sliced olives if desired
 Sour cream optional
 sliced avocado (optional)

Directions:
  • Pre-heat oven to temperature indicated on the package of crescent rolls
  • Lay out the two tubes of crescent pastry around your pie plate, thick sides in.
  • Use some of the left over crescent rolls to cover the center. *Make sure your bottom layer is not to thick and, is evenly spread out. This ensures that all the dough is cooked through and there are no uncooked surprises because it was too thick in some places.*
  • Brown beef and add taco seasoning.
  • Lay beef mixture in a circle inside of the laid out crescent rolls 
  • Add cheese to the top
  • Pull over crescent rolls and tuck in under meat and cheese.
  • Follow cook time on the package of crescent rolls
  • Remove from oven
  • Add cheese, lettuce, tomato, black olives, jalapeno peppers, onions, avocados, sour cream or whatever you desire for your taco pie, in the middle for garnish.
 
I served the meal buffet style, with small bowls filled with cheddar cheese, refried beans, lettuce, onions, tomatoes and sour cream, to add additional flavors for every one's unique tastes. A nice bowl of Mexican Rice, accompanied the meal beautifully!!!


NOW ENJOY!!!
Original recipe courtesy of: http://www.justapinch.com/


Friday, November 1, 2013

ITALIAN GARLIC MASHED POTATOES

I was born Irish, but after 30 years, married to a man named Giansante, I've learned to cook, at least the Italian basics, really well.
These are my Italian Garlic Mashed Potatoes, and they are outrageous. My girlfriend's mother, turned me on to these, when I was about 10 years old. I've since tweaked it here and there, added a few things, and came up with a side dish that it is always a hit in our house. Flavorful and just the right amount of garlic, (not enough to over power the potatoes.) I don't like breathing garlic fire, after I eat, so you are safe here. This just has such an amazing mixture of texture and flavor.

 
Prep Time: 10 minutes, Cook Time: approximately 15 minutes,
Yield: 4 - 5 servings
 
 
Ingredients:
 
6 medium large potatoes, (about 4+ lbs.) washed, peeled and cut up into small pieces. (They cook faster, and more evenly this way.)
2 large cloves of garlic, minced. (use more, up to 4 cloves, if you really, really like garlic.)
4 oz. butter, sliced into small pieces, leave out at room temp. until ready to use.
1/2 cup grated locatelli cheese, (Romano) (but Parmesan cheese works just as well)
3/4 C. milk (more or less, according to texture preference)
1/8 tsp. dry Italian Seasoning
1tsp. fresh basil, very finely chopped. (use dried if necessary)
1 tbsp. fresh chopped chives (use dried if necessary) *TIP* Instead of chopping chives, I use kitchen scissors, it makes life a lot simpler)
1 tsp. sea salt (use regular salt if necessary)
1/4 tsp. fresh ground pepper
6-7 cups water (to boil potatoes in)
salt and pepper to taste
 
*Don't be afraid to change amounts of things like butter or milk. Some people like their mashed potatoes creamy, others lumpy, so add or decrease, according to preference. These are a little bit of both.
*TIP* The key to great mashed potatoes is not over mixing them.
Otherwise, you get potato glue. *LOL*
 
Directions: 
  • In a large pot, that you can use an electric or hand mixer in, add the water and salt, and bring to a boil.
  • Once water is at a rolling boil, add potatoes, and minced garlic. Cook for about 25 minutes, or until desired tenderness. Drain the potatoes, and put them back in the pot.
  • Add cheese, Italian seasoning, pepper, basil, chives and butter.
  • With hand masher first, smash those potatoes. (This cuts down on how long you have to mix) Now use electric mixer on whip, begin to mix the Potatoes, while slowly adding the milk. Rotate the bowl as you mix. *Remember, don't over mix*
  • Stop adding the milk once you have the consistency you want, (I like them somewhat "lumpy"), salt and pepper to taste. Serve while hot.
NOW ENJOY!

RIGATONI PASTA PIE

I have collected tons of recipes over the years. But I have to say, this is one of the best. It is impressive to look at, and incredibly, delicious to eat.
I would like to be able to take the credit for this brilliant work of art, and mouth watering recipe, but I can't. I found it online one day, and tucked it away for a "can do" meal. This is the 3rd time I've made it. And you can be sure it will become a staple of this household.
I will confess I did change a couple of things, but, only for my personal taste preference though.
This is a spot on recipe. If you follow the directions. It will come out perfect every time.
What I loved about it was, that it was actually easy to make and not nearly as time consuming as I thought it would be. Your friends will truly be impressed, if served at a brunch or pot luck dinner.

 
Dinner was just for my me and my husband the other night, and we were glad *LOL* We didn't have to share this beautiful piece of culinary artistry with anyone, and just "pigged" out !!!
It would be perfect with a nice a merlot, or even a zinfandel, red wine, but this night, we choose a hearty beer. Sammy Adams Lager on the left, a Sierra Nevada for me, on the right. I probably have a glass of beer. about 5 times a year!!! Because I like it too much!!!  *LOL* 
Ingredients:
 
 1 lb. rigatoni pasta
 1 lb. ground beef 
 2 garlic cloves (minced)
 1/4 teaspoon fresh ground pepper
 your own homemade sauce (or 1 jar of  your favorite store bought spaghetti sauce)
 salt
 1 cup finely grated Parmesan cheese
 2 cups grated mozzarella cheese
 15oz ricotta cheese 
(The original author of this recipe also added 4oz. cream cheese. I did not. With name like "Giansante" I just couldn't make myself do it *LOL*)
 2 eggs
 1 tsp. basil
 1 tsp. oregano
(This is where preference comes in. I associate oregano with pizza, not my Italian meals. It's taste is noticeable and for me, I didn't want the "pizza" flavor, so I omitted it.)
 1 cup onion
 spring form pan
 cooking spray
 
Directions: 
  • Boil the noodles according to the directions on the box.
  • Stop cooking when they're still very firm and avoid stirring more than once, so they do not fall apart.
This is really important, because you don't want the rigatoni to break or tear.
  • Once done, drain and run cold water over so they are cool enough to handle. .
  •  In a large skillet, brown the ground beef and then, drain excess grease.
  • Add chopped onion and garlic. (cook slow and low, stir often, you don't want your onions and garlic brown, when the onions are translucent and a golden yellow color, proceed to the next step.)
  • After about 5 minutes add cream cheese and stir until melted.
I do not add the cream cheese when I cook this meal.
  • Add spaghetti sauce next. (I used the equivalent of about 1/2 a jar.)
 Use a small mixing bowl to mix the ricotta, Parmesan, basil, oregano (I left this out) and 2 eggs until smooth. (I also added salt to taste and parsley instead of oregano. With the exception of raw pork and chicken, I really do taste as I go. *LOL* 
 

  • Set the mixture aside..
  • Use cooking spray on the bottom of the spring form pan first to avoid sticking.
  • Tightly pack pasta into pan, standing each piece on end
 

  • Put a zip lock bag inside a tall glass and fill the bag with the cheese mixture.
  • Close the bag and snip the corner of the bag and pipe a small amount into each noodle until it's full.

 
  • After piping the mixture into the pasta tubes. Gently bang the pan down straight on a good work surface a couple of times, packing down the cheese filling and sauce. At this point if your pasta tubes have room left, fill them up again. The more you can pack in the better it tastes *LOL* (I repeated this step one more time, but it probably isn't necessary.) 
  • Pour the red ground beef sauce over the whole top and push down as much as possible, without squashing the pasta of course *LOL*.
I went astray on this step too. I added the remainder of the pasta sauce over the noodles first, about 1/4 cup since I did not add the cream cheese to the meat mixture. Not too much, you don't want to drown them either.  I just like a bit more sauce that what was called for in the original recipe. I thought it was a tad too dry in the pasta section, the first time I made it. (Again, ...this is a personal preference.) I poured the sauce alone, on the top so it would seep down into the pasta.
Then, I added the red ground beef mixture.
 Top with 2 cups of mozzarella cheese. (Recipe calls for 2 cups but you can use low fat or skim if you are looking to cut calories.)
  •  Bake at 350 for 20 minutes and...
  •  Then broil until the cheese turns bubbly. (watch this last step closely, you don't want the mozzarella to burn, just a little brown and very bubbly, otherwise the cheese will get hard!!! And we certainly don't want that. If you are worried you will get distracted, you can even omit this step. It really won't make a difference. I actually prefer it without broiling at the end.)
 
 
Serve with a small bowl of sauce, in case anyone wants more. A crusty Italian Bread, and a nice glass of wine. And, if there's room, a nice light salad, tops the meal off!!! I like a simple little cucumber salad with it. 8D
 
 original recipe courtesy of: http://tinyurl.com/rigatoni-pie
 

NOW ENJOY!!!